
Secrets of Tasmania Self-Drive Journey
Secrets of Tasmania Self-Drive Journey
Discover the very best of Tasmania on this unforgettable self-drive journey combining breathtaking wilderness, stunning coastlines, unique wildlife encounters, gourmet experiences, and boutique stays across the island. Beginning in Hobart, this carefully curated itinerary allows you to explore Tasmania at your own pace while experiencing some of the state’s most iconic destinations and hidden gems.
From the historic charm and vibrant waterfront of Hobart, journey to the spectacular Tasman Peninsula for dramatic coastal scenery, a wilderness cruise, and a visit to the fascinating Port Arthur Historic Site. Continue through the heart of Tasmania into the pristine wilderness of Cradle Mountain, where ancient rainforests, alpine landscapes, and native wildlife create one of Australia’s most breathtaking natural environments.
Travel onward through the picturesque Tamar Valley and Launceston region, known for its vineyards, charming countryside, and the spectacular Cataract Gorge. Along Tasmania’s stunning east coast, discover white sandy beaches, turquoise waters, and dramatic granite peaks as you explore St Helens, Freycinet National Park, and the world-famous Wineglass Bay.
Throughout the journey, enjoy handpicked accommodation experiences ranging from luxury wilderness lodges and vineyard domes to coastal retreats and boutique hotels. Included experiences such as the Tasman Peninsula Wilderness Cruise, Tasmanian Devil Feeding Tour, Cataract Gorge Cruise, and Wineglass Bay Adults-Only Cruise offer the perfect balance of adventure, relaxation, and authentic Tasmanian experiences.
With scenic coastal drives, incredible wildlife, fresh local produce, premium wines, and unforgettable landscapes at every turn, this self-drive itinerary is the perfect way to experience the beauty and diversity of Tasmania.
Location
Starts in Hobart, Finishes in Hobart
Duration
9 days / 8 nights
Accommodation
Crowne Plaza Hobart Peppers Cradle Mountain Lodge Domescapes In The Vines Peppers Seaport Launceston The Panorama Hotel Freycinet Lodge Piermont Retreat
Travel Style:
Self Drive Tour
Trip Type:
Private Tour
Physical Grading:
Light
Highlights
- Explore the vibrant waterfront city of Hobart and its historic charm
- Visit the spectacular Tasman Peninsula with dramatic sea cliffs and coastal scenery
- Experience the unforgettable Tasman Peninsula Wilderness Cruise
- Discover the UNESCO-listed Port Arthur Historic Site
- Enjoy a scenic self-drive journey through Tasmania’s changing landscapes and charming towns
- Stay immersed in nature at Peppers Cradle Mountain Lodge
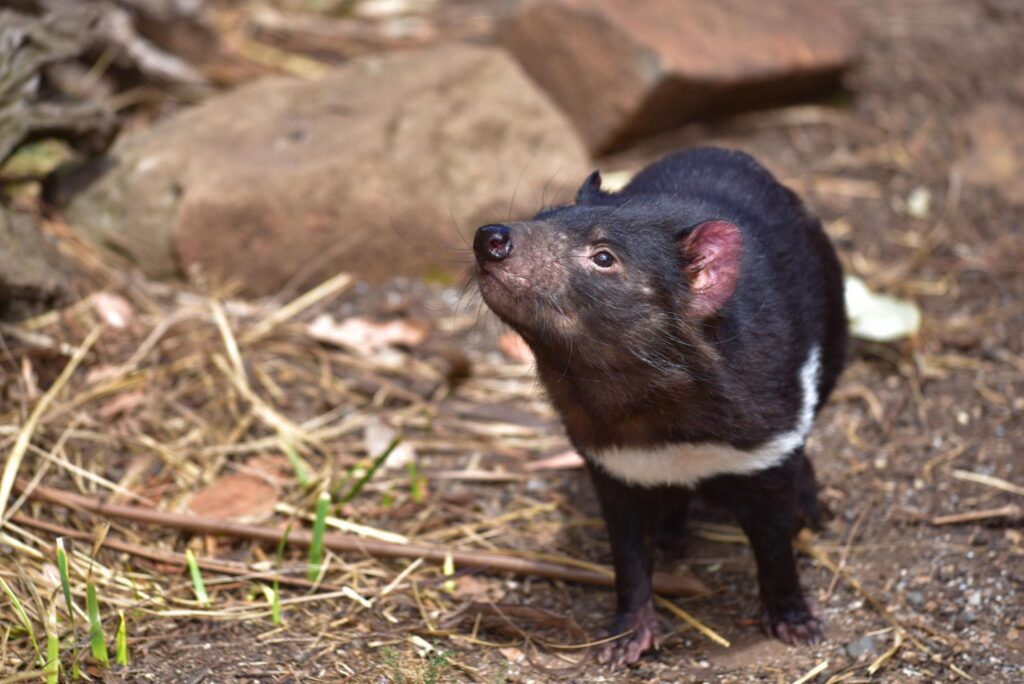
- Enjoy the After Dark Tasmanian Devil Feeding Tour
- Explore the alpine wilderness of Cradle Mountain
- Discover Tasmania’s famous wine region, the Tamar Valley
- Stay at Domescapes In The Vines for a unique luxury dome glamping experience surrounded by vineyards and countryside views
- Cruise through the spectacular Cataract Gorge
- Explore the charming city of Launceston
- Drive along Tasmania’s breathtaking East Coast
- Visit St Helens, gateway to the stunning Bay of Fires
- Experience the beauty of Freycinet National Park
- Enjoy an adults-only Wineglass Bay cruise with lunch and local wines
- Stay surrounded by nature at Freycinet Lodge
- Relax at the stunning beachfront Piermont Retreat
- Discover Tasmania’s white sand beaches, turquoise waters, wildlife, wineries, and gourmet local produce
- Flexible self-drive adventure combining luxury stays, wilderness, coastline, food, and unforgettable scenery throughout the journey
What’s Included
- 8 nights accommodation throughout Tasmania
- Rental car hire with unlimited kilometres
- Hobart Airport pick-up and drop-off
- Full-to-full fuel policy
- Tasman Peninsula Wilderness Cruise
- Visit to the UNESCO-listed Port Arthur Historic Site
- After Dark Tasmanian Devil Feeding Tour at Cradle Mountain
- Cataract Gorge Adventure Cruise in Launceston
- Adults-only Wineglass Bay Cruise with lunch
- Breakfast daily
- Luxury dome glamping experience at Domescapes In The Vines
- Stay at premium handpicked accommodation throughout the journey
- Scenic self-drive itinerary across Tasmania
- Access to Tasmania’s most iconic national parks and coastal regions
- Electronic travel documentation and personalised itinerary
- In-country support throughout your trip
Travel Itinerary

Welcome to Hobart, Tasmania’s charming waterfront capital and the perfect starting point for your self-drive adventure. Upon arrival at Hobart Airport, collect your rental vehicle and begin exploring at your own pace.
Today is designed as a relaxed arrival day, allowing you time to settle into Tasmania’s slower pace and beautiful scenery. The short drive from Hobart Airport into the city centre is approximately 20 km and takes around 25 minutes. Along the way, you’ll enjoy your first glimpses of the River Derwent, rolling hills, and historic sandstone architecture that make Hobart so unique.
Spend the remainder of the day wandering through Salamanca Place, exploring the vibrant waterfront precinct, enjoying local cafés, or visiting the famous Battery Point neighbourhood with its charming colonial cottages and harbour views.
The best time to explore Hobart is during the afternoon and early evening, when the city comes alive with restaurants, local wine bars, and sunset views over the harbour.
Tonight, enjoy your stay at Crowne Plaza Hobart.

Today you’ll experience one of Tasmania’s most spectacular coastal regions with your included full-day Tasman Peninsula adventure departing from Hobart.
Travel approximately 95 km southeast from Hobart to the Tasman Peninsula, a drive of around 1.5 hours through picturesque countryside, farmland, and rugged coastal scenery.
The journey itself is part of the experience, with dramatic ocean views, towering sea cliffs, and native bushland appearing as you approach the peninsula. Along the way, you’ll pass through charming small towns and scenic coastal lookouts.
Your day includes an unforgettable wilderness cruise between Port Arthur Historic Site and Eaglehawk Neck, where you may spot dolphins, Australian fur seals, seabirds, and even migrating whales during the right season.
Later, explore the hauntingly beautiful Port Arthur Historic Site, one of Australia’s most significant convict settlements and a UNESCO World Heritage Site. Allow time to wander through the historic ruins, gardens, and waterfront grounds before returning to Hobart in the evening.
The Tasman Peninsula is best experienced between spring and autumn when wildlife activity and weather conditions are ideal for cruising.
Tonight, return to Crowne Plaza Hobart.
This morning, begin one of Tasmania’s most scenic inland drives as you depart Hobart and journey toward the breathtaking wilderness of Cradle Mountain.
The drive is approximately 300 km and takes around 4 to 4.5 hours, depending on stops along the way. As you travel north through Tasmania’s heartland, the scenery changes dramatically from rolling farmland and historic villages to dense forests and alpine landscapes.
You may wish to stop in charming regional towns such as Deloraine or Sheffield, famous for its colourful murals and views toward the mountains.
As you approach Cradle Mountain, the roads become surrounded by ancient rainforest, towering eucalyptus trees, and dramatic wilderness scenery within the Tasmanian Wilderness World Heritage Area.
This evening, enjoy your included After Dark Tasmanian Devil Feeding Tour at Devils@Cradle Wildlife Sanctuary.
This unique experience offers the chance to observe Tasmania’s iconic nocturnal wildlife up close while learning about local conservation efforts.
The best time to visit Cradle Mountain is during late afternoon and evening, when wildlife becomes more active and the mountain scenery is often at its most atmospheric.
Tonight, stay surrounded by nature at Peppers Cradle Mountain Lodge.

After breakfast, continue your Tasmanian self-drive adventure as you travel from Cradle Mountain toward the beautiful wine region of the Tamar Valley.
Today’s drive to Sidmouth is approximately 150 km and takes around 2.5 hours. The route winds through lush countryside, farmland, riverside landscapes, and some of northern Tasmania’s most picturesque scenery.
Along the journey, you’ll notice Tasmania’s dramatic transition from alpine wilderness to rolling vineyards and pastoral farmland. The Tamar Valley is particularly renowned for its cool-climate wines, lavender farms, berry produce, and charming cellar doors.
Arrive at Domescapes In The Vines for a unique glamping-style experience surrounded by vineyards and peaceful countryside.
The late afternoon is the perfect time to relax with a local wine while enjoying sunset views across the vines.

This morning, make your way toward Launceston, located approximately 45 km from Sidmouth, with a scenic drive time of around 40 minutes.
Today includes your Cataract Gorge Adventure Cruise, one of Launceston’s most iconic experiences.
Cruise along the Tamar River past Kings Wharf and the historic riverfront precinct before entering the spectacular Cataract Gorge. The towering cliffs and tranquil waters provide some of Tasmania’s most beautiful urban scenery.
The silent electric drive vessel allows you to fully appreciate the peaceful atmosphere and natural beauty while learning about the region’s history from the skipper’s commentary.
After your cruise, spend the afternoon exploring Launceston’s cafés, parks, boutiques, and local food scene.
Tonight, stay at Peppers Seaport Launceston.

Today you’ll begin your journey toward Tasmania’s spectacular east coast, travelling from Launceston to St Helens.
The drive is approximately 165 km and takes around 2.5 hours through forests, mountain passes, and coastal scenery.
As you leave Launceston, the landscape gradually transforms into untouched bushland and winding coastal roads. You may wish to stop at scenic lookouts, local farm gates, or beaches along the way.
St Helens is known as the gateway to the stunning Bay of Fires region, famous for its white sandy beaches, turquoise waters, and distinctive orange granite rocks.
This afternoon is ideal for relaxing by the coast, exploring local seafood restaurants, or taking a short scenic drive around the bay.
Tonight, enjoy your stay at The Panorama Hotel.

Today’s drive takes you south along Tasmania’s breathtaking east coast toward Freycinet National Park and Coles Bay.
The drive from St Helens to Coles Bay is approximately 110 km and takes around 1.5 to 2 hours, following one of Tasmania’s most scenic coastal routes.
Along the journey, enjoy stunning ocean views, coastal forests, quiet beaches, and opportunities to spot wildlife such as wallabies and sea birds.
Today includes your adults-only Wineglass Bay Cruise with lunch.
Cruise beneath the dramatic granite peaks of the Freycinet Peninsula while taking in panoramic views of the world-famous Wineglass Bay. The cruise offers excellent opportunities to see dolphins, seals, sea eagles, and pristine untouched coastline.
Enjoy local Tasmanian produce, freshly shucked oysters, and regional wines while relaxing onboard.
The east coast is particularly beautiful during the late morning and afternoon when the sunlight enhances the turquoise waters and white beaches.
Tonight, stay immersed in nature at Freycinet Lodge.

Enjoy a relaxed morning in Freycinet National Park before continuing south to the coastal town of Swansea.
Today’s drive is short and scenic, approximately 60 km and around 1 hour in duration, allowing plenty of time to stop at beaches, wineries, and lookouts along Tasmania’s beautiful east coast.
The Great Eastern Drive is one of Australia’s most underrated coastal routes, featuring uninterrupted ocean views, rolling farmland, and dramatic mountain backdrops.
You may wish to stop at local wineries or enjoy lunch overlooking Great Oyster Bay before arriving in Swansea.
This afternoon is perfect for relaxing and soaking in the peaceful coastal atmosphere.
Tonight, stay at the beautiful Piermont Retreat in your Deluxe Spa Suite overlooking the ocean.

Today marks the end of your unforgettable Tasmanian self-drive journey.
Depart Swansea and enjoy one final scenic coastal drive back to Hobart Airport.
The drive is approximately 135 km and takes around 2 hours, following sections of Tasmania’s stunning east coast before returning inland toward Hobart.
Along the way, enjoy final views of vineyards, beaches, rolling countryside, and the Tasman Sea before arriving at the airport to return your rental vehicle.
Depending on your flight time, you may wish to stop at a local café, winery, or lookout for one last taste of Tasmania before your departure.
We hope you leave with incredible memories of Tasmania’s rugged wilderness, pristine coastline, unique wildlife, and unforgettable road trip experiences.
Please note advertised and quoted pricing for bookings and online payments is based on low season and advance purchase fares and is subject to change until booking confirmation and payment/deposit is received. Any fare difference will be advised and, once approved by you, added to the final balance due 70 days prior to the start of the trip.Departure dates & prices
| Start | Status | Twin Share | |
|---|---|---|---|
| 17 April 2026 | Available Year-Round | AUD $2,998 | Enquire |
| 01 May 2026 | Available Year-Round | AUD $2,998 | Enquire |
| 15 May 2026 | Available Year-Round | AUD $2,998 | Enquire |
| 29 May 2026 | Available Year-Round | AUD $2,998 | Enquire |
| 12 June 2026 | Available Year-Round | AUD $2,998 | Enquire |
| 26 June 2026 | Available Year-Round | AUD $2,998 | Enquire |
| 10 July 2026 | Available Year-Round | AUD $2,998 | Enquire |
| 24 July 2026 | Available Year-Round | AUD $2,998 | Enquire |
| 07 August 2026 | Available Year-Round | AUD $2,998 | Enquire |
| 21 August 2026 | Available Year-Round | AUD $2,998 | Enquire |
| 04 September 2026 | Available Year-Round | AUD $2,998 | Enquire |
| 18 September 2026 | Available Year-Round | AUD $2,998 | Enquire |
| 02 October 2026 | Available Year-Round | AUD $2,998 | Enquire |
| 16 October 2026 | Available Year-Round | AUD $2,998 | Enquire |
| 30 October 2026 | Available Year-Round | AUD $2,998 | Enquire |
| 13 November 2026 | Available Year-Round | AUD $2,998 | Enquire |
| 27 November 2026 | Available Year-Round | AUD $2,998 | Enquire |
| 11 December 2026 | Available Year-Round | AUD $2,998 | Enquire |
| 25 December 2026 | Available Year-Round | AUD $2,998 | Enquire |
| 08 January 2027 | Available Year-Round | AUD $2,998 | Enquire |
| 22 January 2027 | Available Year-Round | AUD $2,998 | Enquire |
| 05 February 2027 | Available Year-Round | AUD $2,998 | Enquire |
| 19 February 2027 | Available Year-Round | AUD $2,998 | Enquire |
| 05 March 2027 | Available Year-Round | AUD $2,998 | Enquire |
| 19 March 2027 | Available Year-Round | AUD $2,998 | Enquire |
| 02 April 2027 | Available Year-Round | AUD $2,998 | Enquire |
| 16 April 2027 | Available Year-Round | AUD $2,998 | Enquire |
| 30 April 2027 | Available Year-Round | AUD $2,998 | Enquire |
| 14 May 2027 | Available Year-Round | AUD $2,998 | Enquire |
| 28 May 2027 | Available Year-Round | AUD $2,998 | Enquire |
| 11 June 2027 | Available Year-Round | AUD $2,998 | Enquire |
| 25 June 2027 | Available Year-Round | AUD $2,998 | Enquire |
| 09 July 2027 | Available Year-Round | AUD $2,998 | Enquire |
| 23 July 2027 | Available Year-Round | AUD $2,998 | Enquire |
| 06 August 2027 | Available Year-Round | AUD $2,998 | Enquire |
| 20 August 2027 | Available Year-Round | AUD $2,998 | Enquire |
| 03 September 2027 | Available Year-Round | AUD $2,998 | Enquire |
| 17 September 2027 | Available Year-Round | AUD $2,998 | Enquire |
| 01 October 2027 | Available Year-Round | AUD $2,998 | Enquire |
| 15 October 2027 | Available Year-Round | AUD $2,998 | Enquire |
| 29 October 2027 | Available Year-Round | AUD $2,998 | Enquire |
| 12 November 2027 | Available Year-Round | AUD $2,998 | Enquire |
| 26 November 2027 | Available Year-Round | AUD $2,998 | Enquire |
| 10 December 2027 | Available Year-Round | AUD $2,998 | Enquire |
| 24 December 2027 | Available Year-Round | AUD $2,998 | Enquire |
Enquire about this tour
Complete the form and one of our Australian and New Zealand travel specialists will be in touch within 24 hours